ASP.NET MVC - Helpers
In ASP.Net web forms, developers are using the toolbox for adding controls on any particular page. However, in ASP.NET MVC application there is no toolbox available to drag and drop HTML controls on the view. In ASP.NET MVC application, if you want to create a view it should contain HTML code. So those developers who are new to MVC especially with web forms background finds this a little hard.
To overcome this problem, ASP.NET MVC provides HtmlHelper class which contains different methods that help you create HTML controls programmatically. All HtmlHelper methods generate HTML and return the result as a string. The final HTML is generated at runtime by these functions. The HtmlHelper class is designed to generate UI and it should not be used in controllers or models.
There are different types of helper methods.
- Createinputs − Creates inputs for text boxes and buttons.
- Createlinks − Creates links that are based on information from the routing tables.
- Createforms − Create form tags that can post back to our action, or to post back to an action on a different controller.
If you look at the view from the last chapter which we have generated from EmployeeController index action, you will see the number of operations that started with Html, like Html.ActionLink and Html.DisplayNameFor, etc. as shown in the following code.
@model IEnumerable<MVCSimpleApp.Models.Employee>
@{
   Layout = null;
}

<!DOCTYPE html>
<html>
   <head>
      <meta name = "viewport" content = "width = device-width" />
      <title>Index</title>
   </head>

   <body>
      <p>
         @Html.ActionLink("Create New", "Create")
      </p>

      <table class = "table">
         <tr>
            <th>
               @Html.DisplayNameFor(model => model.Name)
            </th>

            <th>
               @Html.DisplayNameFor(model => model.JoiningDate)
            </th>

            <th>
               @Html.DisplayNameFor(model => model.Age)
            </th>

            <th></th>
         </tr>

         @foreach (var item in Model) {
            <tr>
               <td>
                  @Html.DisplayFor(modelItem => item.Name)
               </td>

               <td>
                  @Html.DisplayFor(modelItem => item.JoiningDate)
               </td>

               <td>
                  @Html.DisplayFor(modelItem => item.Age)
               </td>

               <td>
                  @Html.ActionLink("Edit", "Edit", new { id = item.ID }) |
                  @Html.ActionLink("Details", "Details", new { id = item.ID }) |
                  @Html.ActionLink("Delete", "Delete", new { id = item.ID })
               </td>
            </tr>
         }

      </table>
   </body>
</html>
This HTML is a property that we inherit from the ViewPage base class. So, it's available in all of our views and it returns an instance of a type called HTML Helper.
Let’s take a look at a simple example in which we will enable the user to edit the employee. Hence, this edit action will be using significant numbers of different HTML Helpers.
If you look at the above code, you will see at the end the following HTML Helper methods
@Html.ActionLink("Edit", "Edit", new { id = item.ID })
In the ActionLink helper, the first parameter is of the link which is “Edit”, the second parameter is the action method in the Controller, which is also “Edit”, and the third parameter ID is of any particular employee you want to edit.
Let’s change the EmployeeController class by adding a static list and also change the index action using the following code.
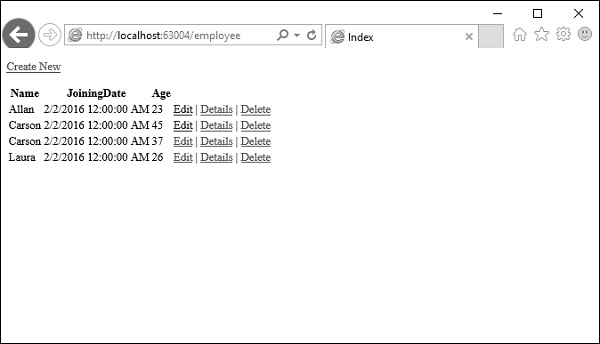
public static List<Employee> empList = new List<Employee>{
   new Employee{
      ID = 1,
      Name = "Allan",
      JoiningDate = DateTime.Parse(DateTime.Today.ToString()),
      Age = 23
   },

   new Employee{
      ID = 2,
      Name = "Carson",
      JoiningDate = DateTime.Parse(DateTime.Today.ToString()),
      Age = 45
   },

   new Employee{
      ID = 3,
      Name = "Carson",
      JoiningDate = DateTime.Parse(DateTime.Today.ToString()),
      Age = 37
   },

   new Employee{
      ID = 4,
      Name = "Laura",
      JoiningDate = DateTime.Parse(DateTime.Today.ToString()),
      Age = 26
   },

};

public ActionResult Index(){
   var employees = from e in empList
   orderby e.ID
   select e;
   return View(employees);
}
Let’s update the Edit action. You will see two Edit actions one for GET and one for POST. Let’s update the Edit action for Get, which has only Id in the parameter as shown in the following code.
// GET: Employee/Edit/5
public ActionResult Edit(int id){
   List<Employee> empList = GetEmployeeList();
   var employee = empList.Single(m => m.ID == id);
   return View(employee);
}
Now, we know that we have action for Edit but we don’t have any view for these actions. So we need to add a View as well. To do this, right-click on the Edit action and select Add View.

You will see the default name for view. Select Edit from the Template dropdown and Employee from the Model class dropdown.
Following is the default implementation in the Edit view.
@model MVCSimpleApp.Models.Employee
@{
   Layout = null;
}

<!DOCTYPE html>
<html>
   <head>
      <meta name = "viewport" content = "width = device-width" />
      <title>Edit</title>
   </head>

   <body>
      @using (Html.BeginForm()){
         @Html.AntiForgeryToken()
         <div class = "form-horizontal">
            <h4>Employee</h4>
            <hr />
            @Html.ValidationSummary(
               true, "", new { @class = "text-danger" })

            @Html.HiddenFor(model => model.ID)

            <div class = "form-group">
               @Html.LabelFor(
                  model => model.Name, htmlAttributes: new{
                     @class = "control-label col-md-2" })

               <div class = "col-md-10">
                  @Html.EditorFor(model => model.Name, new{
                     htmlAttributes = new {
                        @class = "form-control" } })

                  @Html.ValidationMessageFor(model => model.Name, "", new{
                        @class = "text-danger" })
               </div>

            </div>

            <div class = "form-group">
               @Html.LabelFor(
                  model => model.JoiningDate, htmlAttributes: new{
                     @class = "control-label col-md-2" })

               <div class = "col-md-10">
                  @Html.EditorFor(
                     model => model.JoiningDate, new{
                        htmlAttributes = new{ @class = "form-control" } })

                  @Html.ValidationMessageFor(
                     model => model.JoiningDate, "", new{
                        @class = "text-danger" })
               </div>

            </div>

            <div class = "form-group">
               @Html.LabelFor(
                  model => model.Age, htmlAttributes: new{
                     @class = "control-label col-md-2" })

               <div class = "col-md-10">
                  @Html.EditorFor(
                     model => model.Age, new{
                        htmlAttributes = new{ @class = "form-control" } })

                  @Html.ValidationMessageFor(
                     model => model.Age, "", new{
                        @class = "text-danger" })
               </div>

            </div>

            <div class = "form-group">
               <div class = "col-md-offset-2 col-md-10">
                  <input type = "submit" value = "Save" class = "btn btn-default"/>
               </div>
            </div>

         </div>
      }

      <div>
         @Html.ActionLink("Back to List", "Index")
      </div>

   </body>
</html>
As you can see that there are many helper methods used. So, here “HTML.BeginForm” writes an opening Form Tag. It also ensures that the method is going to be “Post”, when the user clicks on the “Save” button.
Html.BeginForm is very useful, because it enables you to change the URL, change the method, etc.
In the above code, you will see one more HTML helper and that is “@HTML.HiddenFor”, which emits the hidden field.
MVC Framework is smart enough to figure out that this ID field is mentioned in the model class and hence it needs to be prevented from getting edited, that is why it is marked as hidden.
The Html.LabelFor HTML Helper creates the labels on the screen. The Html.ValidationMessageFor helper displays proper error message if anything is wrongly entered while making the change.
We also need to change the Edit action for POST because once you update the employee then it will call this action.
// POST: Employee/Edit/5
[HttpPost]
public ActionResult Edit(int id, FormCollection collection){
   try{
      var employee = empList.Single(m => m.ID == id);
      if (TryUpdateModel(employee)){
         //To Do:- database code
         return RedirectToAction("Index");
      }
      return View(employee);
   }catch{
      return View();
   }
}
Let’s run this application and request for the following URL http://localhost:63004/employee. You will receive the following output.
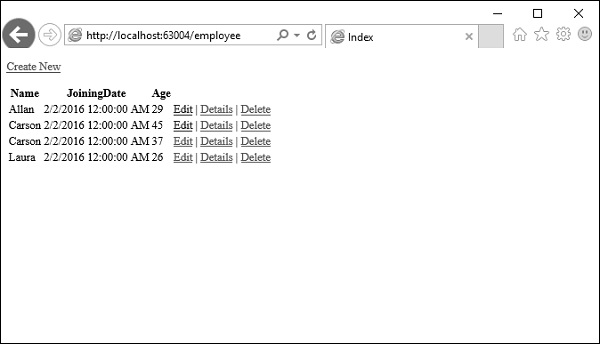
Click on the edit link on any particular employee, let’s say click on Allan edit link. You will see the following view.

Let’s change the age from 23 to 29 and click ‘Save’ button, then you will see the updated age on the Index View.
No comments:
Post a Comment